年初的时候折腾了一段时间的网站,由于我对 React 是比较熟悉的所以就想折腾一下 React ,但是 React 最适合的是写单页 web app ,我却一直用来折腾 react 的多页面和服务器渲染技术。虽然吃了不少苦但是不后悔,还是学到很多东西的。
我年初用这个方法写了一个公司官网,本来当时就应该发这篇博客了的,但是一直鸽着…
因为自己和小伙伴弄的东西也不少了,我自己收藏的网站不管是关于开发还是有关设计又或者其他资源的网站,已经感觉很乱了。所以我就想整个导航网站正好把以前买的域名用上 PBKhub.com ,感觉自己网站没搞两个,域名到是买了一大堆…
关于我的导航网站,我在这里先立下一些 flag ?(不喜欢看的小伙伴们直接忽略这里哦…)
1,网站导航功能
2,优质文章链接功能
3,优质网站或 APP 推荐功能
4,友情链接
5,关于我自己的介绍页面
6,那些被我放弃过的项目 or 事情
7,我的个人小目标
8,天真的树洞(就是我自己用来丧的地方啦)
9,匿名给天真写一封信(邀请朋友帮我揭露盲点象限的小功能)
上面都是我自己讲给自己听的一些废话,小伙伴们可以直接看这里我们直接开始今天的主题
我这里用的是 create-react-app 脚手架来搭建我的 React 项目,要知道实际上 create-react-app 搭建好的项目就是利用 webpack 打包静态资源。
但是默认配置的打包是只输出一个 index.html 页面的,于是我们解决让其根据我们指定的文件夹输出不同的 html 页面实际上就能达到我们的目的。ok 知道这个原理后我们看看怎么让 create-react-app 搭建的项目能够让自己配置控制 webpack 打包
create-react-app 是有提供 eject 方法的,执行 eject 后将会将原有隐藏的依赖( 比如 Webpack, Babel, ESLint 等)暴露出来
npm run eject执行后,我们可以在 package.json 中看到完整的依赖包了,同时我们项目下面会多出两个文件夹 config 和 scripts,config 中就是项目的一些模块配置了其中就包含我们想要修改的 Webpack 配置文件,scripts 中是一些编译脚本,稍后我们也是要修改部分编译脚本达到我们的一个输出多页面的效果
首先我们先整理一下 src 目录,将默认生成出来的文件删除,创建 pages 文件夹(以后我们创建一个页面就在这里创建一个文件夹)
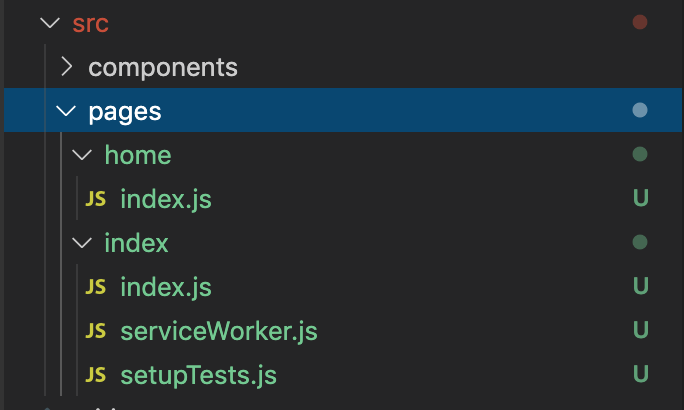
我这里创建了两个文件夹,一个是 index 文件夹,一个是 home 文件夹,每个文件夹下面的 index.js 就是页面入口文件了
现在你如果在跑页面的话会发现页面已经访问不了了,这是由于我们把 index 的位置改变了,我们需要打开 config/paths.js 文件修改 appIndexJs 代码为我们现在最新的 src/pages/index/index
……

// config after eject: we're in ./config/
module.exports = {
  dotenv: resolveApp('.env'),
  appPath: resolveApp('.'),
  appBuild: resolveApp('build'),
  appPublic: resolveApp('public'),
  appHtml: resolveApp('public/index.html'),
  appIndexJs: resolveModule(resolveApp, 'src/pages/index/index'),
  appPackageJson: resolveApp('package.json'),
  appSrc: resolveApp('src'),
  appTsConfig: resolveApp('tsconfig.json'),
  appJsConfig: resolveApp('jsconfig.json'),
  yarnLockFile: resolveApp('yarn.lock'),
  testsSetup: resolveModule(resolveApp, 'src/setupTests'),
  proxySetup: resolveApp('src/setupProxy.js'),
  appNodeModules: resolveApp('node_modules'),
  publicUrlOrPath,
};

……
现在我们文件夹整理好了,我们要知道默认的 webpack 只会生成一个 html 所以我们需要修改 webpack 配置让它根据我们 src/pages/ 文件夹下面的子文件夹数目生成多个 html,每个页面的 js 再绑定不同 html 页面以实现我们另类的多页面网站
首先我们需要读取我们 src/pages 下面现在有多少文件夹然后把这个数据放到我们的 config/paths.js 导出的配置中,待会在 webpack 中就根据这里指定的页面打包不同的 html,首先我们定义一个 Scan 方法,循环读取我们 src/pages 下面的文件夹生成一个带页面路径的数组并返回给 dirs 变量最后导出
……

function Scan() {
  const path = "src/pages";
  const dirs = fs.readdirSync(resolveApp(path));
  const map = [];
  dirs.forEach((file) => {
    const state = fs.statSync(resolveApp(path + file));
    if (state.isDirectory()) {
      map[file] = resolveModule(resolveApp, path + file + "/index");
    }
  });
  return map;
}
const dirs = Scan();

// config after eject: we're in ./config/
module.exports = {
  dotenv: resolveApp('.env'),
  appPath: resolveApp('.'),
  appBuild: resolveApp('build'),
  appPublic: resolveApp('public'),
  appHtml: resolveApp('public/index.html'),
  appIndexJs: resolveModule(resolveApp, 'src/pages/index/index'),
  appPackageJson: resolveApp('package.json'),
  appSrc: resolveApp('src'),
  appTsConfig: resolveApp('tsconfig.json'),
  appJsConfig: resolveApp('jsconfig.json'),
  yarnLockFile: resolveApp('yarn.lock'),
  testsSetup: resolveModule(resolveApp, 'src/setupTests'),
  proxySetup: resolveApp('src/setupProxy.js'),
  appNodeModules: resolveApp('node_modules'),
  publicUrlOrPath,
  dirs,
};

……
现在我们配置 webpack.config.js ,我们需要写一个 setup 方法来为每一个页面生成一个 entry 配置对象
  // 多页面配置区
  function setup() {
    // 存放入口文件
    const entry = {
      index: [
        require.resolve("react-dev-utils/webpackHotDevClient"),
        paths.appIndexJs,
      ],
    };

    // 存放 HtmlWebpackPlugin 插件组
    const plugins = [];
    Object.keys(paths.dirs).forEach((key) => {
      entry[key] = [
        require.resolve("react-dev-utils/webpackHotDevClient"),
        paths.dirs[key],
      ];

      const newPlugins = new HtmlWebpackPlugin({
        chunks: [key],
        inject: true,
        template: paths.appHtml,
        filename: key === 'index' ? 'index.html' : `${key}/index.html`,
      });

      plugins.push(newPlugins);
    });

    return { entry, plugins };
  }
  // 这里要注意要运行一次,将配置对象生成
  const Setup = setup();

return {
    mode: isEnvProduction ? 'production' : isEnvDevelopment && 'development',
    // Stop compilation early in production
    bail: isEnvProduction,
    devtool: isEnvProduction
      ? shouldUseSourceMap
        ? 'source-map'
        : false
      : isEnvDevelopment && 'cheap-module-source-map',
    // These are the "entry points" to our application.
    // This means they will be the "root" imports that are included in JS bundle.
    entry: Setup.entry,
    plugins: [
      // Generates an `index.html` file with the <script> injected.
      // 默认页面 HtmlWebpackPlugin 插件
      new HtmlWebpackPlugin(
        Object.assign(
          {},
          {
            inject: true,
            template: paths.appHtml,
            chunks: ['index'],
            fileName: 'index.html'
          },
          isEnvProduction
            ? {
                minify: {
                  removeComments: true,
                  collapseWhitespace: true,
                  removeRedundantAttributes: true,
                  useShortDoctype: true,
                  removeEmptyAttributes: true,
                  removeStyleLinkTypeAttributes: true,
                  keepClosingSlash: true,
                  minifyJS: true,
                  minifyCSS: true,
                  minifyURLs: true,
                },
              }
            : undefined
        )
      ),

      // 展开全部页面的 HtmlWebpackPlugin 插件
      ...Setup.plugins,

    ]
    ……
}
修改 webpack.config.js 中 filename 配置
……

filename: isEnvProduction
      ? 'static/js/[name].[contenthash:8].js'
      : isEnvDevelopment && 'static/js/[name].bundle.js',

……
webpack.config.js 中用的 ManifestPlugin 插件这里有点坑,我们改多页面后需要改一下
      // Generate an asset manifest file with the following content:
      // - "files" key: Mapping of all asset filenames to their corresponding
      //   output file so that tools can pick it up without having to parse
      //   `index.html`
      // - "entrypoints" key: Array of files which are included in `index.html`,
      //   can be used to reconstruct the HTML if necessary
      new ManifestPlugin({
        fileName: "asset-manifest.json",
        publicPath: paths.publicUrlOrPath,
        generate: (seed, files, entrypoints) => {
          const manifestFiles = files.reduce((manifest, file) => {
            manifest[file.name] = file.path;
            return manifest;
          }, seed);

          let entrypointFiles = [];
          Object.keys(entrypoints).forEach((key) => {
            entrypointFiles = entrypoints[key].filter(
              (fileName) => !fileName.endsWith(".map")
            );
          });

          return {
            files: manifestFiles,
            entrypoints: entrypointFiles,
          };
        },
      }),
最后,我们修改 scripts/start.js 和 scripts/build.js 脚本文件,添加 fileName 展开到 checkRequiredFiles 中
const fileName = Object.keys(paths.dirs).map((key) => {
  return paths.dirs[key];
})

// Warn and crash if required files are missing
if (!checkRequiredFiles([paths.appHtml, ...fileName])) {
  process.exit(1);
}
现在我们多页面就实现了,可以运行 npm run start 或者编译 npm run build 看看具体效果。
不过我觉得吧,通过读取文件夹还是太生硬了,最好搞个 manifest 文件来配置需要编译的页面和页面属性配置,反正可优化空间还有很多,慢慢来吧…
我代码都提交到 GitHub 了,喜欢的小伙伴可以点个 star :https://github.com/PBK-B/web-react-pages-demo